- (0)203 423 5326 (sales only)
Setting up Classes for Microsoft Teams - for IT staff
We use Microsoft Graph to check for classes. Graph recognises classes created manually or with Microsoft SDS, and is compatible with most other systems.
You don't need to read any further unless you're sure there's a problem.
If you create classes manually using the Teams for Education app you will be OK.
For automated solutions, setting up classes with Microsoft Schools Data Sync and Locker, etc. work fine. A number of schools use Salamander to access SIS data, then Schools Data Sync to set up the classes automatically.
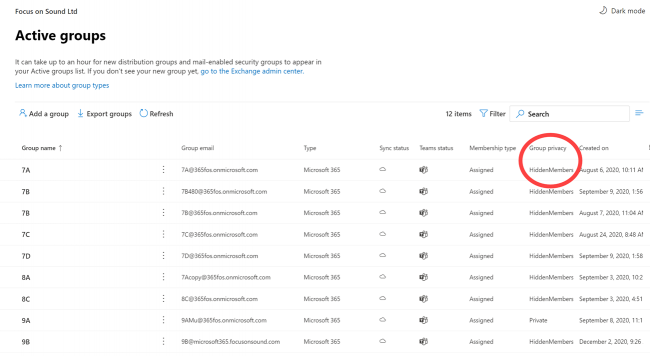
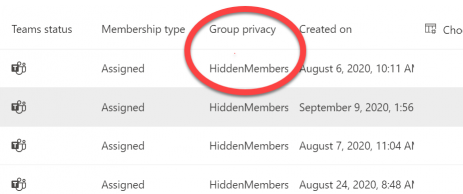
It is essential that each Team required for Focus on Sound has its type set as Class (EDU_Class template) with the HiddenMembership flag. No current Powershell system achieves this - but it is standard in Schools Data Sync.
Groups created by SDS are not the same as M365 groups created by end users or those created by an Admin when using the M365 Admin portal or PowerShell. The key difference is that with SDS the visibility option is set to hidden membership. Graph looks for the HiddenMembership flag to identify a class. We are not aware of any way of manually setting the HiddenMembership flag on any classes already created via Powershell.
Workaround to create classes visible to Focus on Sound using Powershell.
Please note that this should no longer be necessary (after February 2022)
If you have to use Powershell, here is a suggestion. It has been tried and tested. We'd like to thank Steve from Penryn School in Cornwall for his help here.
Manually create each class required through the normal Teams interface, ensuring the type is set as Class. This is essential as the Focus on Sound link relies on seeing the Class flag (EDU_Class template).
- You will then need to add the students. You may well have your own way of doing it, but below are suggestions.
- Create a spreadsheet with 3 columns – one for class name, one for student e-mail address and one for membership role. Ensure columns have headers.
- Populate this spreadsheet with the classes and student memberships from your MIS or other source. Fill in the role with either member (for a student) or owner (for a staff member / teacher). Save to a known location.
- Run Powershell ISE as an Administrator
- Run the command Connect-MicrosoftTeams and then login with your admin credentials
- Run Get-Team – this will return a list of all Teams with their friendly names as well as the GroupID. This GroupID is required for the import process
- For each class find the GroupID and replace the class name in your spreadsheet with this
Example spreadsheet of classes and member e-mails:
| Class | Role | |
|---|---|---|
| GCSE Music 1 | asmith@school.uk | Member |
| GCSE Music 1 | bjones@school.uk | Member |
| GCSE Music 1 | HarryM@school.uk | Owner |
| GCSE Music 2 | cgreen@school.uk | Member |
| GCSE Music 2 | dwhite@school.uk | Member |
This becomes:
| GroupID | Role | |
|---|---|---|
| aaaaaaaa-bbbb-cccc-dddd-112233445566 | asmith@school.uk | Member |
| aaaaaaaa-bbbb-cccc-dddd-112233445566 | bjones@school.uk | Member |
| aaaaaaaa-bbbb-cccc-dddd-112233445566 | HarryM@school.uk | Owner |
| eeeeeeee-ffff-gggg-998877665544 | cgreen@school.uk | Member |
| eeeeeeee-ffff-gggg-998877665544 | dwhite@school.uk | Member |
Once you have created the spreadsheet save it as a .csv file
Back in Powershell, type the following:
$inputcsvfile = Import-Csv (Read-Host "Enter CSV Location") – this will prompt for the path to the .csv
foreach($line in $inputcsvfile)
{Add-TeamUser -GroupId $line.GroupID -User $line.Email -Role $line.Role -ErrorAction SilentlyContinue}
Once completed check in Teams admin for the correct memberships